Your cart is currently empty!
Twelve Step Modular Terrain Board Success
introduction
Contents
- 1 Visualize The Battlefield
- 2 Make The Module Trays
- 3 Step 3 – in which we torture Styrofoam insulation to good effect
- 4 Step 4 – in which a simple grass mat transforms our modular terrain board
- 5 Step 5 – in which we learn roads and rivers have a lot in common
- 6 Step 6 – in which pine bark and joint compound give us some relief
- 7 Step 7 – in which we learn why one adds sand to paint
- 8 Step 8 – in which we learn to make earth by stippling
- 9 Step 9 – in which we learn a dry brush mysteriously holds lots of paint
- 10 Step 10 – in which we learn about details
- 11 Step 11 – in which we paint a river bed
- 12 Step 12 – In which we pour water into the river
Visualize The Battlefield
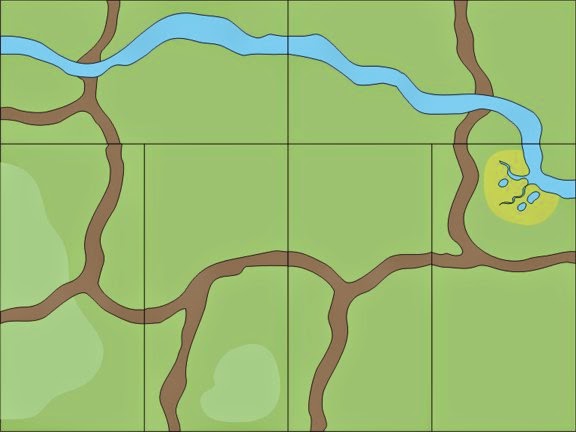
You start the design process by imagining a battlefield. Visualize each terrain element like grassy meadows, rivers, hills, and valleys. Then draw a rough sketch of the battlefield.
Since you are creating a modular terrain board, you need to break the sketch into individual panels. So you draw their outline and then cut them out.
One of the advantages of a modular terrain board is its ability to create many different battlefields from a single set of panels. So you need to test your design by reconfiguring the individual panels to create multiple battlefields.
You may find a configuration where the elements that cross panels don’t meet adequately. You may decide that the layout isn’t essential, so you make no changes.
On the other hand, you may want to adjust the elements on each panel. For example, a road does not meet correctly. Such changes increase the number of battlefields you can create.
Learn how to visualize your terrain in Quindia Studios Guide to Modular Terrain Boards, Part One.
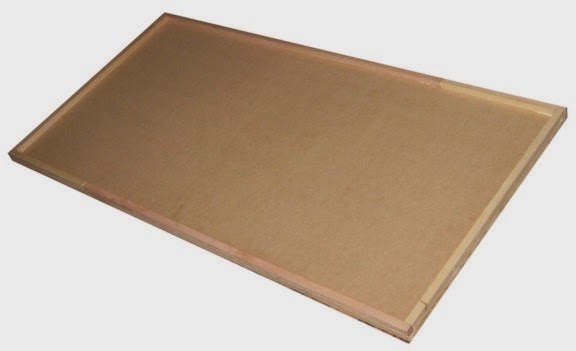
Make The Module Trays
The panel size for this project is 2 feet by 4 feet. There are six modules in the basic design. So you will have to create six trays.
Save Time With MDF
Each tray base is made from 1/2inch Medium Density Fiberboard (MDF). You can find 1/2inch MDF already cut into 2 feet by 4 feet pieces at any big box home improvement store.
Every Panel Needs An Edge
You will also make a wood frame called a batten for each tray. The batten protects the terrain and strengthens the base. Plus, it creates a finished look.
The batten is made from 3/4″ x 3/4″ square solid pine lattice molding. The actual dimension of the lattice is about 1/2″ square. So it works well with the 1/2″ foam insulation used to create the terrain. You can get these in 8 feet lengths at the same place you get the MDF.
Don’t worry. You won’t need any fancy woodworking skills because you will make a simple butt joint at each batten corner. Once you cut the batten pieces, you will glue them to the top of the base. You may want to reinforce each corner with a brad.
Secure The Batten With Screws
Then flip it over to drill and countersink pilot holes for flat head wood screws. Now put in the screws to hold the battens firmly in place and help strengthen the edges of the panel.
You use countersunk flat head wood screws to make a smooth bottom so the board will not damage any table you set it on.
Since the combined thickness of the MDF and the batten is about 1″, use a flat head wood screw 3/4″ long. Either a number 6 or 8 screw should be suitable for this light general construction.
River Panels Get Special Treatment
Rivers are formed by cutting a channel in the foam base. Rivers that cross panels require a gap in the batten to let it connect to the adjoining module.
To create a strong, neat edge for the river, you will cut the batten at an angle. Just use a 45-degree miter cut to support the river banks.
Add A Soft Bottom
Originally, the project called for felt pads for the bottom of a tray to protect the surface of your table.
Today, soft non-adhesive shelf liners are a better choice. They are available in 24inch widths. So you cover the entire bottom. Plus, they are non-slip, which helps keep the modules in place.
Apply construction adhesive to the entire bottom of the module. Then roll the shelf liner onto the bottom surface. Use a brayer to make sure there is complete contact with the adhesive. Apply weight to the shelf liner until the glue has cured.
Learn how to create your own modules in Quindia Studios Guide to Modular Terrain Boards, Part Two.
Step 3 – in which we torture Styrofoam insulation to good effect
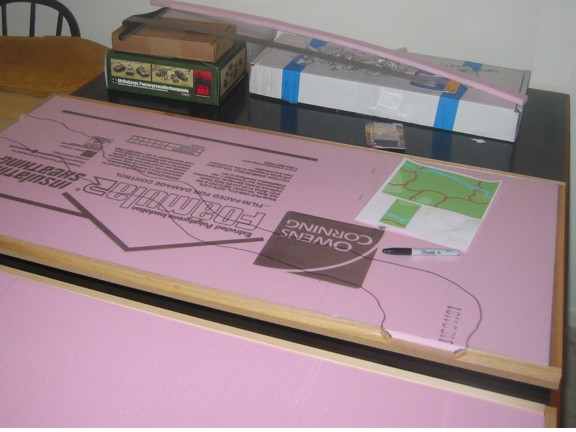
Now that the basic modules have been built it is time to add an easily carved ground to create relief. You can get insulation board at the same big box home improvement store you got the MDF.
Sometimes, the foam has a plastic vapor barrier facing. You will need to remove the facing. This makes it easier for the adhesive to hold it in place. Plus it is easier to carve.
In Quindia Studios Guide to Modular Terrain Boards, Part Three we learn how to create terrain with Styrfoam insulation boards.
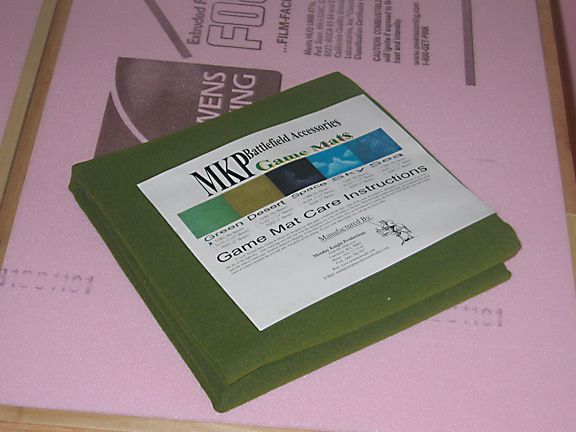
Step 4 – in which a simple grass mat transforms our modular terrain board
Quindia Studios Guide to Modular Terrain Boards, Part Four
Ok, we are going to start to make these things look more like terrain this time. There are lots of ways to add texture to your game boards, but the way that I have found to be the best and quickest (quick is big with me), is to glue a grass mat to the board. There are lots of different styles and you could use any one you choose, but you want one with a cloth or felt backing rather than a paper one, for reasons that will become obvious as we go through this article.

Step 5 – in which we learn roads and rivers have a lot in common
Quindia Studios Guide to Modular Terrain Boards, Part Five
The adventure continues. This post will show how I start down the road to add… errr… roads! Since these boards are designed to fit together which each other in as many combinations as possible, I can’t just start drawing anywhere. Referring back to my trusty diagram (from article one), I locate the only flat board I have planned and check the pattern of the road. All of my roads will be two inches wide which will allow most of my collections to fit in march columns. The roads may vary on the board, but they must be consistent at the edge to minimize noticing the join between boards. All of the roads must also enter from a consistent spot, in this case, eighteen inches from a corner. If you refer back to article one, you can see that even though this sounds very limiting, the combinations available are substantial.
Step 6 – in which pine bark and joint compound give us some relief
Quindia Studios Guide to Modular Terrain Boards, Part Six
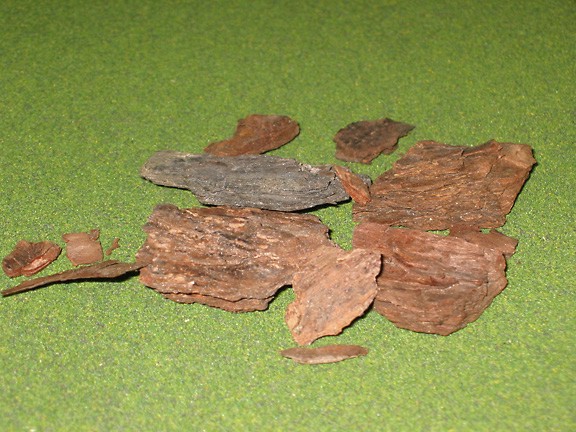
Before we get back to the roads, I’m going to take a few minutes to add some large stones to my landscape. Rather than use rocks, or carve boulders out of foam (either of which would work fine), I’m going to use pine bark. Take a few minutes to hop over to my Desert Terrain Boards posts (Part One and Part Two) to see what these things look like when they are painted. I’ll wait for you…
Step 7 – in which we learn why one adds sand to paint
Quindia Studios Guide to Modular Terrain Boards, Part Seven
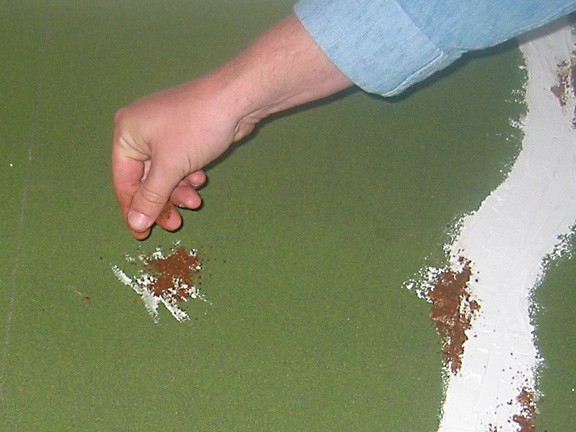
Onward! Time to add texture. The first step I use is to scatter patches of rubble, paying particular attention to the edge of roadways and rivers and around the “boulders” I placed earlier. I also cover up parts of the putty where the knife strokes seem too obvious. You can add patches in open ground as well (see the photos below) but remember that you also want to leave room to place loose terrain pieces. Your models will look fine teetering on a pile of rock, but although your cottage model will be in no danger of falling over, it won’t look as good if one corner of it’s base is off the ground.
Step 8 – in which we learn to make earth by stippling
Quindia Studios Guide to Modular Terrain Boards, Part Eight
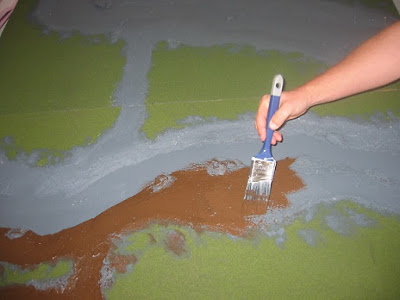
Here’s the first of several articles on painting the boards. Not only are we going to paint the roads and river, but we are going to add some paint in areas of the grass to keep it from looking too much like a golf course!

Step 9 – in which we learn a dry brush mysteriously holds lots of paint
Quindia Studios Guide to Modular Terrain Boards, Part Nine
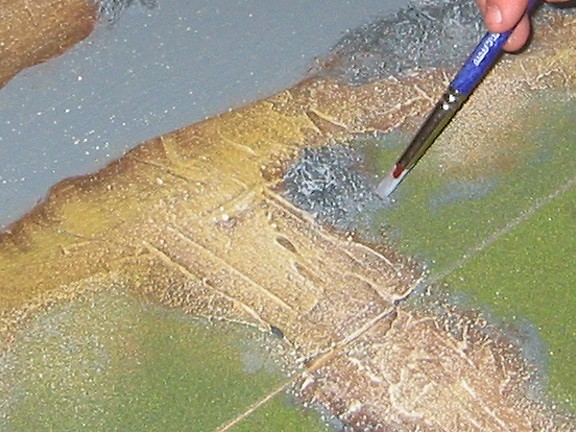
Before we move on to the fourth color, I thought maybe a brief note on drybrushing was in order for anyone who is a beginner and maybe is unfamiliar with the technique. To start with, I try not to dip more than a third of my brush into the paint (that goes for all of my painting). Then wipe the brush across a paper towel a few times until most of the paint appears to be off of the brush. Then lightly draw the brush across the textured road and you’ll notice that only the highest points of the texture catches the paint. This really will bring out the texture we applied earlier with these last two steps. As I mentioned earlier, it is always better to put down too little paint and go over an area several times than blob on too much!
Step 10 – in which we learn about details
Quindia Studios Guide to Modular Terrain Boards, Part Ten
This step is about adding some detail back to the landscape. All of the drybrushing blended in the rubble and rocks we went to all of the trouble of adding earlier, so they need to be picked back out in dark grey. I used two highlight stages to bring out the detail again. Again I have three quarts of acrylic house paint that I matched to GW colors. The shades are Shadow Grey (No longer available), Codex Grey, and Fortress Grey. Basically, you just need a dark, medium, and light. For that matter, your rocks could be shades of brown or the left the color of the rest of the bare earth. I used grey for the same reason I worked some other tones into my grass areas; I think the color variation really adds to the interest of the boards.
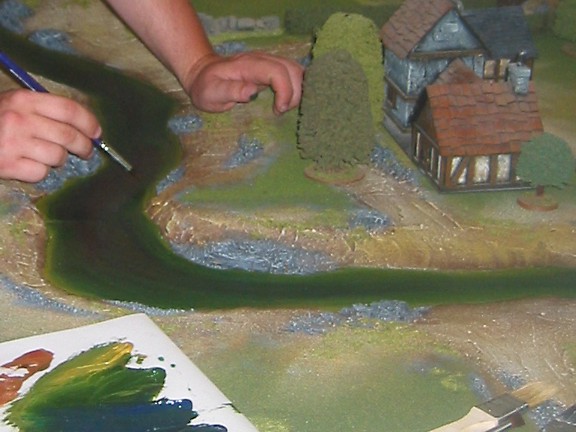
Step 11 – in which we paint a river bed
Surprisingly, water is clear and colorless. Yet rivers, lakes, and oceans all have vibrant colors. Those colors come from four sources.
First is the sky. A gray day is reflected in gray waters as is a bright blue sky reflected in azure waters.
Second is the river bottom. A river with a white sandy bottom is light in color, while a dark bottom yields a dark river.
Third, rivers grind away the banks and bottoms which confine them. Small particles float down stream coloring the water.
Finally, a river is home to countless microorganisms like algae which also color the water.
In Quindia Studios Guide to Modular Terrain Boards, Part Eleven we learn to use our artistic flair with artists acrylics to create realistic river colors.
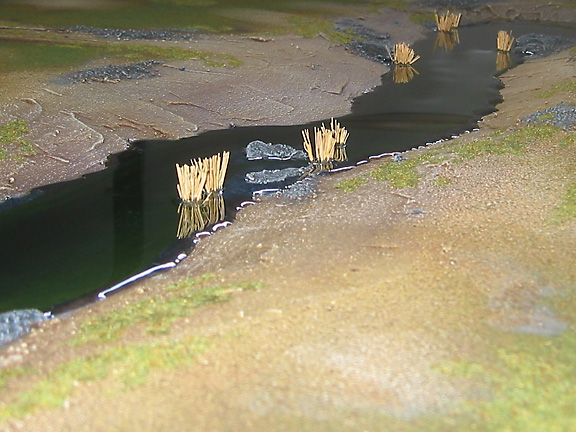
Step 12 – In which we pour water into the river
Rivers are very prominent terrain features. To add the last touches of realism to a terrain board, we need to capture the visual impact of water. Our experience tells us that light glints off the surface of water. It is shiny. We also know that we can see down into the water. It is transparent.
In the final step of Quindia Studios Guide to Modular Terrain Boards, Part Twelve we learn how to create the visual depth and shiny surface of water by using a two-stage resin.